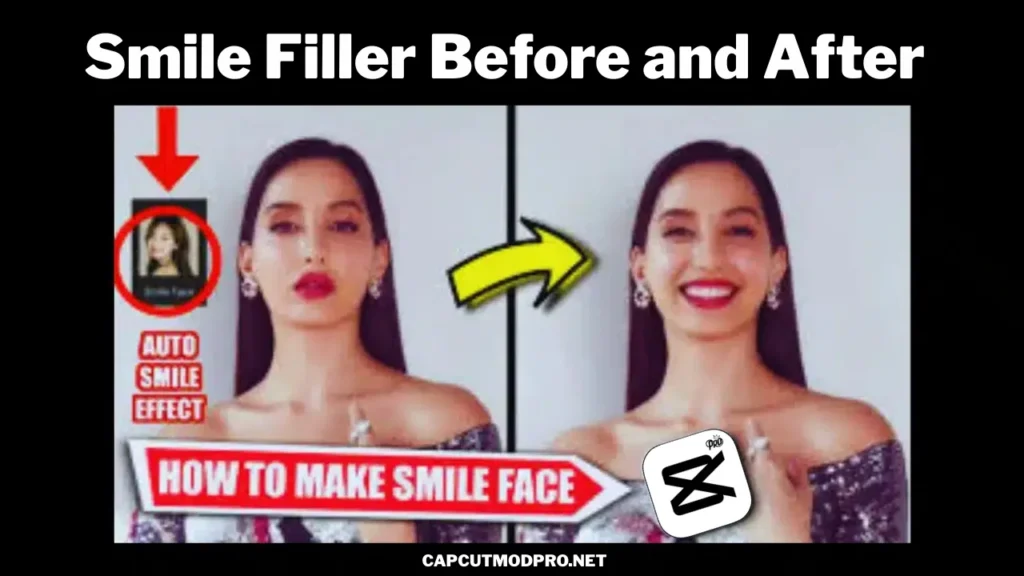
How to add a smile to a face using CapCut pro APK
In this comprehensive guide, you’ll learn how to add a smile to a face using CapCut through simple, step-by-step methods. We’ll cover reliable techniques based on CapCut’s built-in features like expression effects, style adjustments, retouch tools, templates, and even AI-powered options. These approaches work on both photos and videos, helping you transform neutral or serious expressions into cheerful ones with minimal effort. The best part? You can do all this right on your mobile device or desktop version of CapCut, and the results often look natural and authentic.
Smiling edits are incredibly popular because a genuine-looking smile evokes positivity, confidence, and warmth. It can turn an ordinary photo into something uplifting or make video content more relatable. With practice, you’ll gain confidence in using these tools to enhance expressions creatively and positively.
Why Choose CapCut for Adding Smiles to Faces?
CapCut stands out as an excellent choice for smile edits due to several key advantages:
- Ease of Use — The app’s clean layout and straightforward menus make it accessible even if you’re new to editing.
- Free Access — Most essential features, including smile-related effects and basic retouching, are available without any cost.
- AI-Powered Intelligence — Modern versions include smart facial recognition that detects faces automatically, applying changes smoothly.
- Versatility — Works for static photos, dynamic videos, single faces, or group shots.
- High-Quality Output — Edits preserve image quality while allowing fine adjustments for realism.
- Regular Updates — The app frequently adds new effects and improvements, keeping your creative options fresh.
By following the methods below, you can achieve beautiful smile enhancements that feel natural and enhance the overall mood of your content.
Method 1: Using Built-in Expression Effects (Style or Expressions Category)
One of the most direct and popular ways to add a smile in CapCut is through the Expressions or Style effects. This feature uses facial mapping to apply a smiling expression automatically.
Step-by-Step Guide:
- Launch CapCut and Start a Project Open the CapCut app on your phone or computer. Tap the “+” icon or “New Project” button to begin. This opens your media library.
- Import Your Media Select the photo or video clip where you want to add a smile. For photos, import a clear, front-facing image. For videos, choose a clip with a visible face. Drag the media to the timeline.
- Select the Clip or Photo Tap on the photo or video segment in the timeline to highlight it. This ensures edits apply only to the desired part.
- Access Effects or Style Options Look for the “Effects” button (often shown as a sparkle icon) or navigate to “Style” in the editing toolbar at the bottom or side menu.
- Search for Smile-Related Effects In the effects panel, browse categories like “Style,” “Expressions,” “Face,” or “AI Effects.” Search for terms like “smile,” “smiling face,” “smile face,” or “expression smile” if there’s a search bar.
- Apply the Smile Effect Tap on an effect labeled “Smile Face,” “Smiley,” “Expression: Smile,” or similar. CapCut’s facial detection will automatically map to the face and apply the change. Wait a few seconds for processing — you’ll see the mouth curve upward, cheeks lift slightly, and eyes brighten for a natural grin.
- Adjust Intensity and Fine-Tune Use sliders (if available) to control smile strength — from subtle to wide. Adjust duration for videos so the smile appears gradually or stays constant. Preview to ensure it looks realistic.
- Preview and Export Play back your edit. If satisfied, tap “Export” to save in high resolution. Choose your preferred format and quality.
This method is quick and effective for most portraits, delivering an auto smile look without complex manual work.
Method 2: Leveraging Retouch and Beauty Tools for Smile Enhancement
CapCut’s Retouch or Beauty features let you refine facial details, including brightening smiles, whitening teeth, or subtly lifting mouth corners for a happier appearance.
Step-by-Step Guide:
- Import and Select Media Start a new project and add your photo or video to the timeline.
- Go to Retouch/Beauty Section Select the clip, then find “Retouch,” “Beauty,” or “Face” in the tools menu.
- Focus on Mouth and Smile Adjustments Look for options like “Smile Lines,” “Mouth,” “Teeth Whitening,” or “Expression Adjustment.” Reduce smile lines if needed, but more importantly, use sliders for mouth shape or expression to create an upward curve.
- Whiten Teeth for a Brighter Smile Enable “Teeth Whitening” to make any visible teeth sparkle naturally, enhancing the joyful effect.
- Smooth Skin and Brighten Overall Apply gentle skin smoothing and brightness around the mouth/cheek area to complement the smile.
- Preview Changes Toggle before/after views to see improvements. Adjust subtly to avoid over-editing.
- Export Your Enhanced Content Save the final version.
This approach is ideal when you want a realistic, enhanced smile rather than a dramatic change.
Method 3: Applying Smile Face Templates for Creative Edits
CapCut’s Templates library includes ready-made smile face designs, perfect for fun, trendy videos or adding overlay effects.
Step-by-Step Guide:
- Create a New Project Import your base video or photo.
- Browse Templates Tap “Templates” at the bottom. Search “smile face,” “smiling face,” “smile effect,” or “happy face.”
- Select and Apply a Template Choose one that matches your vision — some auto-apply smile animations or overlays.
- Customize Fit Resize, reposition, or adjust opacity so it blends naturally with the face.
- Edit Further Combine with other effects for personalization.
- Export Download your cheerful creation.
Templates add flair and are great for social media trends.
Method 4: Exploring AI-Powered Smile Generation (Advanced Option)
For cutting-edge results, CapCut’s AI tools can generate or transform expressions intelligently.
Step-by-Step Guide:
- Access AI Features In a new project, look for “AI Design,” “AI Effects,” or similar.
- Upload Photo Import your image.
- Use Prompt or Smile Tool If available, enter a prompt like “add natural smile” or select smile generation.
- Generate and Refine Let AI process, then tweak.
- Save Export the smiling version.
This delivers highly natural results for portraits.
Tips for Natural and Beautiful Smile Edits
- Use well-lit, high-resolution images for best detection.
- Start subtle — overdone smiles can look unnatural.
- Combine methods (e.g., expression effect + teeth whitening).
- Preview on different devices.
- Practice on copies to experiment freely.
- Stay positive — edits should enhance confidence and joy.
Common Mistakes to Avoid
- Ignoring lighting — edit in good light.
- Applying too strong effects.
- Forgetting to preview animations in videos.
Conclusion: Spread Joy with Your Edits
Adding a smile using CapCut is simple, rewarding, and fun. With these techniques, you can create uplifting content that brings happiness to viewers. Experiment, enjoy the process, and watch your creations shine with positivity. Happy editing — keep smiling!